Oston Saralu – My Lady (feat. Shakamon)
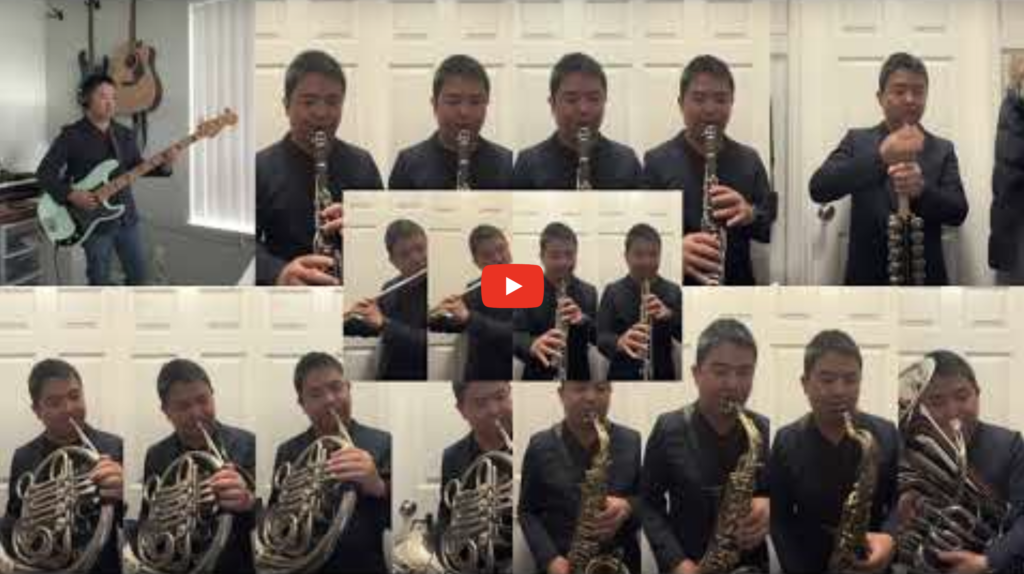
I recorded horns 🎷🎺🎶 for my friend Oston Saralu’s new recording of My Lady! Check it out.
Guam-grown 🇬🇺 musician 🎹 educator 👨🏫 and software developer 💻 living in the SF Bay Area 🌉

I recorded horns 🎷🎺🎶 for my friend Oston Saralu’s new recording of My Lady! Check it out.
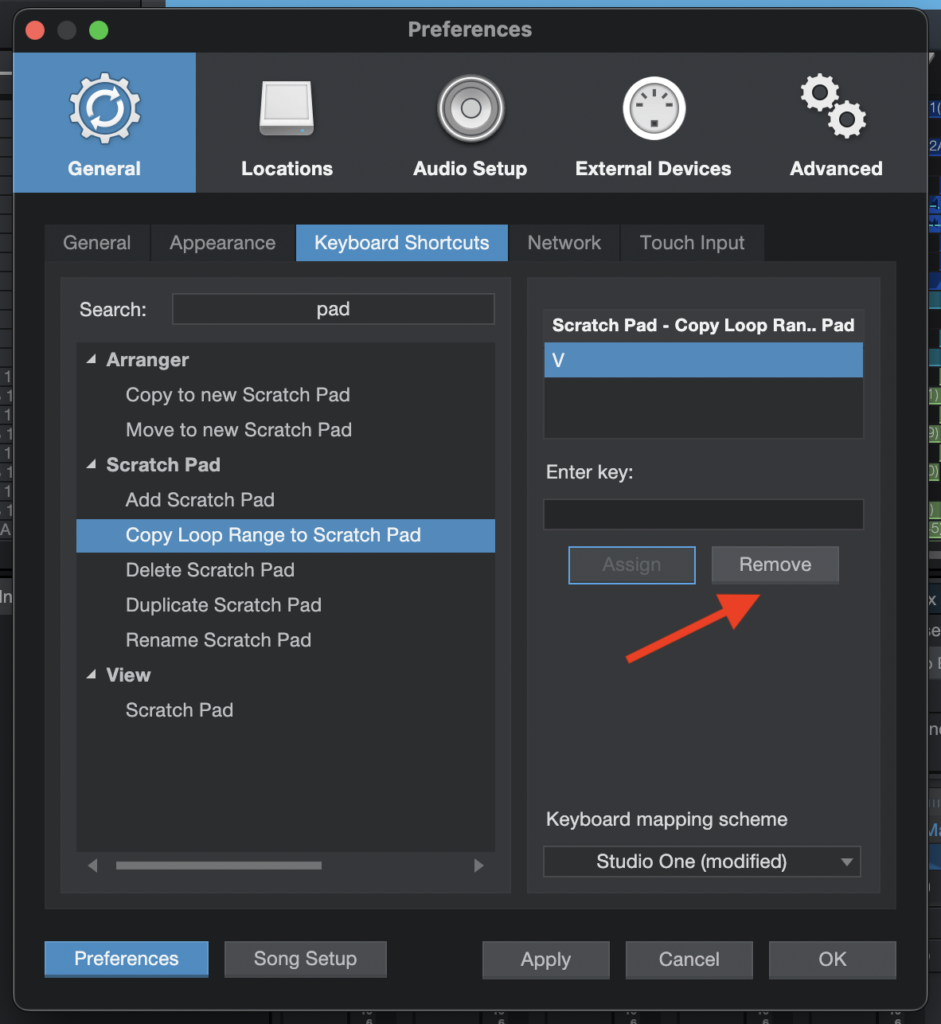
Ever try to paste something using “⌘V” but accidentally just hit “V” instead which opens the Scratch Pad? Well, I just did on a huge project and it crashed (M1 Max MacBook Pro 64GB Ram) making me lose some work (thankfully auto-save is a thing).
If you’re clumsy like me and keep hitting that dang “V” key by accident, do yourself a favor and remove that hotkey assignment (or if you use the Scratch Pad frequently, assign it to a different key) in the preferences pane as follows in the screenshot:
The bug: Image styles don’t generate (they all return 404) when using the following:
So you’ll need to override lando’s default vhosts file. You can do so by doing the following in your .lando.yml file.
name: projectname
recipe: drupal9
config:
  via: nginx
  config:
    vhosts: lando/default.conf
Then you’ll need to create a file in your app root lando/default.conf . To start, you can go to the lando/drupal recipe page , go into the recipe you’re using, and then copy the default.conf.tpl into your lando/default.conf file.
Next, locate the following snippet:
  # Fighting with Styles? This little gem is amazing.
  # location ~ ^/sites/.*/files/imagecache/ { # For Drupal <= 6
  location ~ ^(/[a-z\-]+)?/sites/.*/files/styles/ { # For Drupal >= 7
      try_files $uri @rewrite;
  }
And replace it with the following snippet (only regex is changed)
  # Fighting with Styles? This little gem is amazing.
  # location ~ ^/sites/.*/files/imagecache/ { # For Drupal <= 6
  location ~ '^(/[a-z\-]+)?/sites/.*/files/styles/|^/s3/files/styles/' { # For Drupal >= 7
      try_files $uri @rewrite;
  }
I also opened a GitHub issue in case someone on the project wanted to commit back to the project. I may get around to it if I have time.
Hope this helps. I spent a couple hours on this since I didn’t know why my image styles weren’t generating and I couldn’t find anyone else that was running into the same problem. Good luck!
I tried learning this on the guitar from the top Google searches on different guitar chord sites, and not only is it really hard to play with the chord voicings they provide, it also doesn’t sound right either.
Here’s what they give (incorrect “standard” chord voicings which don’t sound like the recording):
Am x02210
G  320003 (or 320033) «--- I don't think either of these are correct
Dm xx0231 «--- This is incorrect
If you listen carefully, there’s a slide in the root note between G and Dm which leads me to believe that Dm is actually played in an alternate voicing (on the 5th string).
Try this out. It fits better in the hand too:
Am x02210 «--- Same as original
G  3200xx «--- I don't hear any high strings in the recording, so mute them
Dm x5776x «--- Your index finger on the A string will glide up nicely from the 2nd to the 5th fret.
And then for the chorus, It’s all chords on the first string since it’s easier to get that muted sound with your left index finger
F  1332xx
Am 5775xx
G  3554xx
Hope this saves you all some time and pain from trying to learn it the wrong way (which also doesn’t sound anything like the recording).
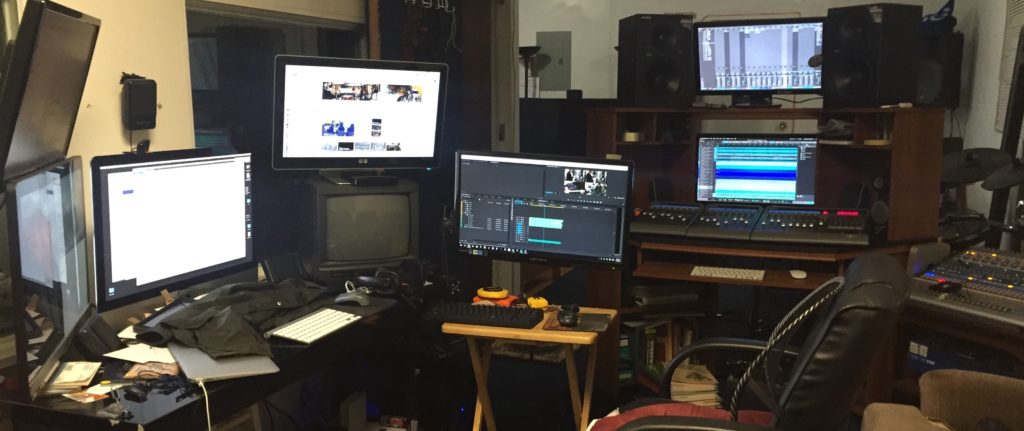
I forget when this picture was taken, but it has to have been around 2014-2015. One day, I will have enough space to make a new mancave 😀
If you have an M1 Mac and have tried using Melodyne with Studio One, chances are you probably ran into this screen:
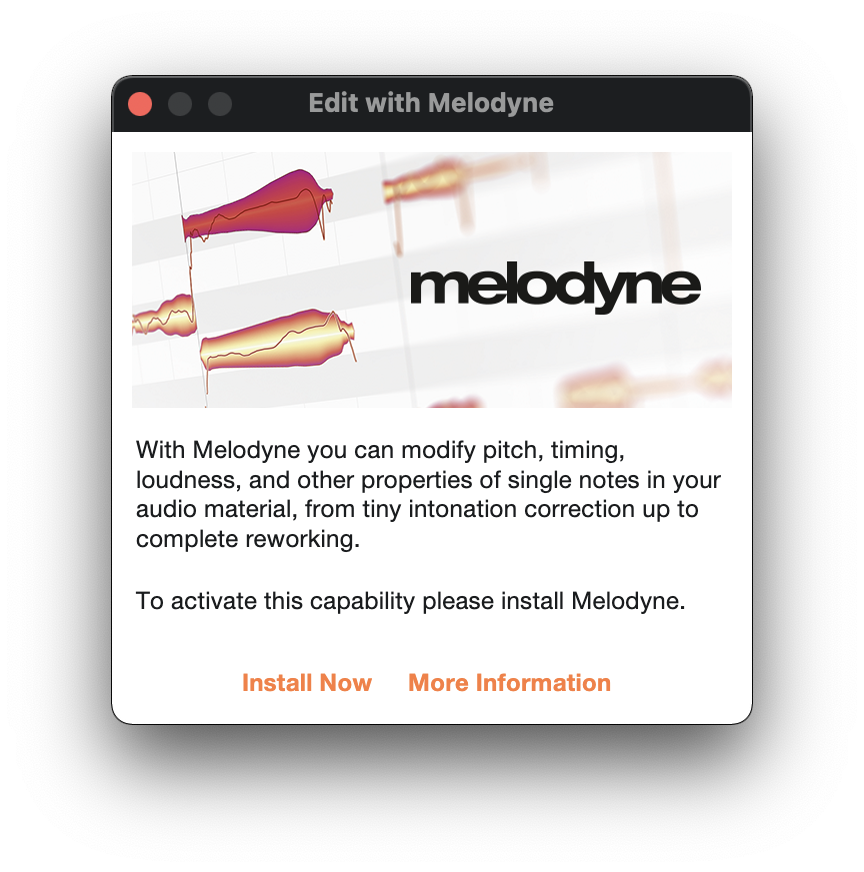
Anyway, long story short, running Studio One on native Apple Silicon makes it so that it can’t detect VST plugins that need Rosetta (like Melodyne).
https://support.presonus.com/hc/en-us/articles/4407850496141
The fix is to run Studio One in Rosetta:
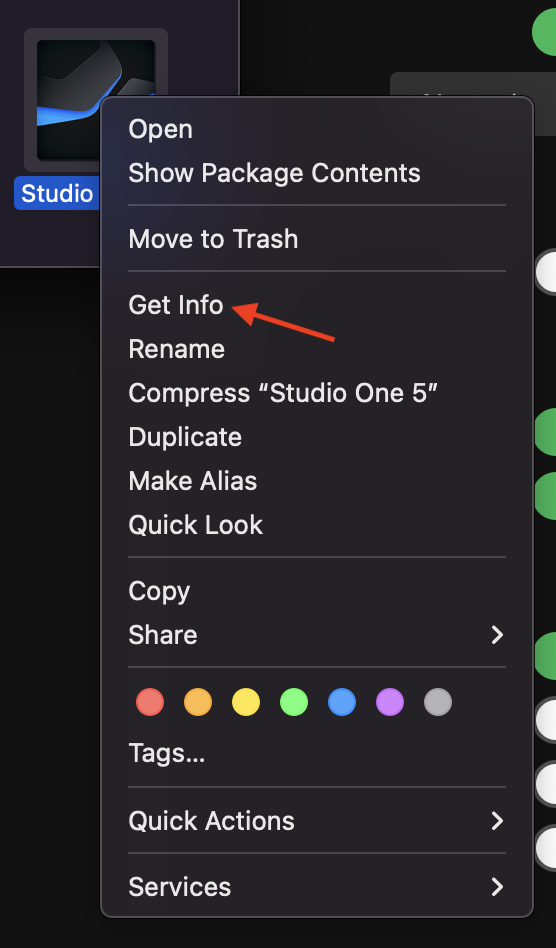
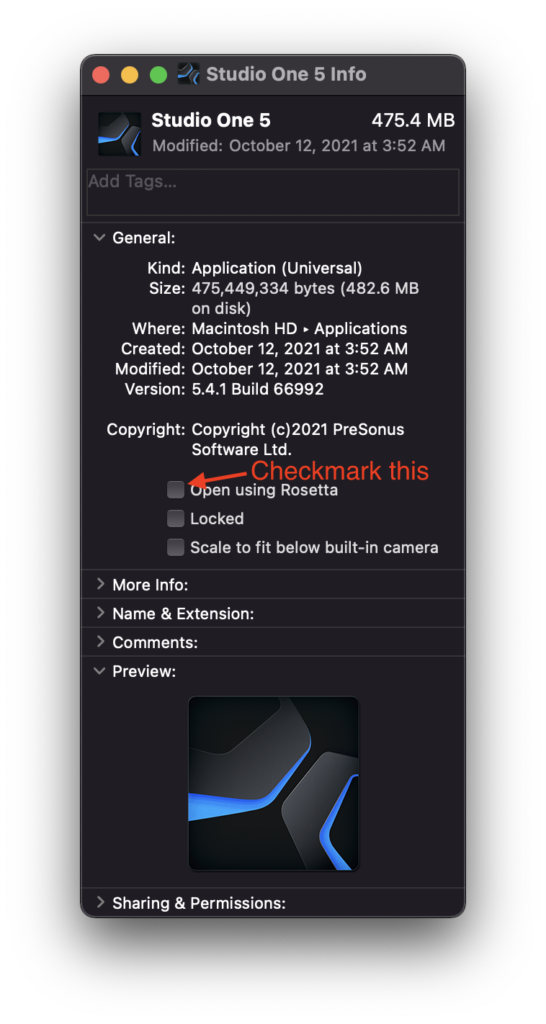
I recently had to move my blog from WebFaction (who was bought out by GoDaddy and then eventually shut down their services) to Digital Ocean.
I couldn’t upload files for the longest time and kept messing with file permissions as recommended from all the different Google searches I did. And nothing was working.
Turns out, my server was configured properly, but I forgot to change the Store uploads in this folder value via WordPress dashboard when I switched webservers at /wp-admin/options-media.php.

Hopefully this helps someone else.
If you use Smartling for translation management and it’s all setup for production, here’s how to override those values on your local development environment to download pseudo-translations for easier debugging if you don’t need to test actual translations.
Add this to your settings.local.php:
// Force to always download pseudo translations (altered strings).
$config['tmgmt.translator.smartling']['settings']['retrieval_type'] = 'pseudo';

// Whether to skip the TMGMT review process after downloading. Set to TRUE to skip, FALSE to not skip.
$config['tmgmt.translator.smartling']['auto_accept'] = TRUE;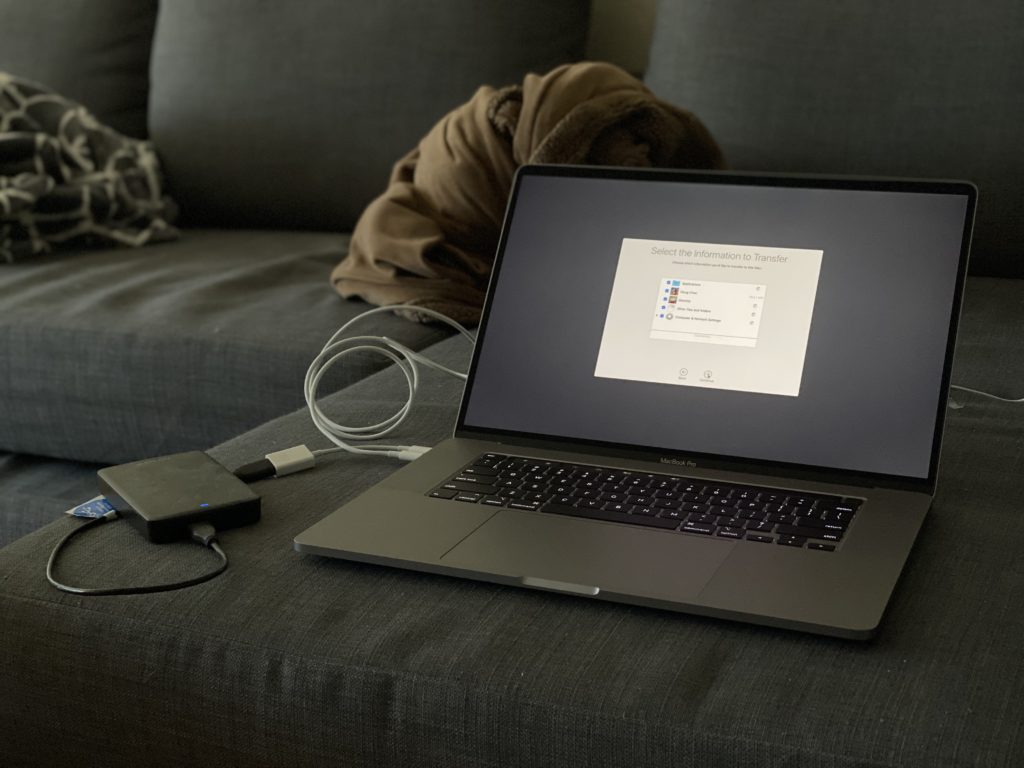
I just upgraded from my 2018 13″ MacBook Pro because the keyboard started randomly repeating letters “I”, “O”, and “T” which made it really hard to work fast when I had to backspace every 5 words or so.
When I heard that the 16″ MBP was in the refurb store, I couldn’t wait to try out the new Magic Keyboard. Unfortunately, all the Apple Stores are closed now, so I couldn’t go into the store to try it first. Plus, I wanted to know how the Magic Keyboard would work for me I the long term.
My first impression when I got my “new” refurb 16″ was that the keyboard FELT AMAZING. I absolutely loved it. And I loved thinking that I would never run into any keyboard reliability issues again.
But after using the Magic Keyboard for work for a week (about 10-12 hours per day), I have to say, my RSIs are getting worse. So I wanted to write up something really quick in case anyone else with the same issues as me have concerns about switching to the Magic Keyboard if they also prefer the feel of the butterfly switches.
Ok so let me rephrase the title, the butterfly switches FEEL better for me. Here are the reasons.
As a musician AND a programmer, I am using my hands all the time. So naturally, pushing towards 40 years of being alive, naturally I have some wrist and hand issues.
The butterfly switches have less key travel and require less effort to press. Because of this, I feel like I exert less effort when typing on the butterfly switches, and in the end, that makes my hands really happy.
Which leads me to my next point…
Since I exert less effort when typing, I can translate that saved energy to move faster between different keys. I type anywhere between 100-120 wpm with >95% accuracy, but I feel more confident doing so on the butterfly switch keyboard.
Some people complain the switches are loud, but if you adjust your typing in such a way where you touch they keys just enough for them to register instead of jamming them like you would a standard mechanical keyboard, you’ll find that you’ll type faster too.
Ok, so the Magic Keyboard does have some pros.
I did mention that I had a problem with repeated keys with the butterfly switches. But the Magic Keyboard… They are tried and true to not have these kind of issues (or at least fewer issues). I never heard of anyone having basic wear and tear keyboard issues on their 2015 and earlier MBPs.
I also acknowledge that the Magic Keyboard will be appreciated by a majority of the people who do prefer the more key travel and people who like smashing their keys really hard.
I’ve been using this 16″ MBP for a week now, and my RSIs are now radiating from my wrists into my shoulders and neck now. I’m guessing the nerves are all connected like that somehow.
As much as I absolutely love everything else the 16″ MBP has to offer (8 cores, dedicated GPU which is great for gaming), I feel like I have to go back to a MBP with butterfly switches, even if that does mean I may occasionally have to deal with sending in the laptop for repairs once in a while.
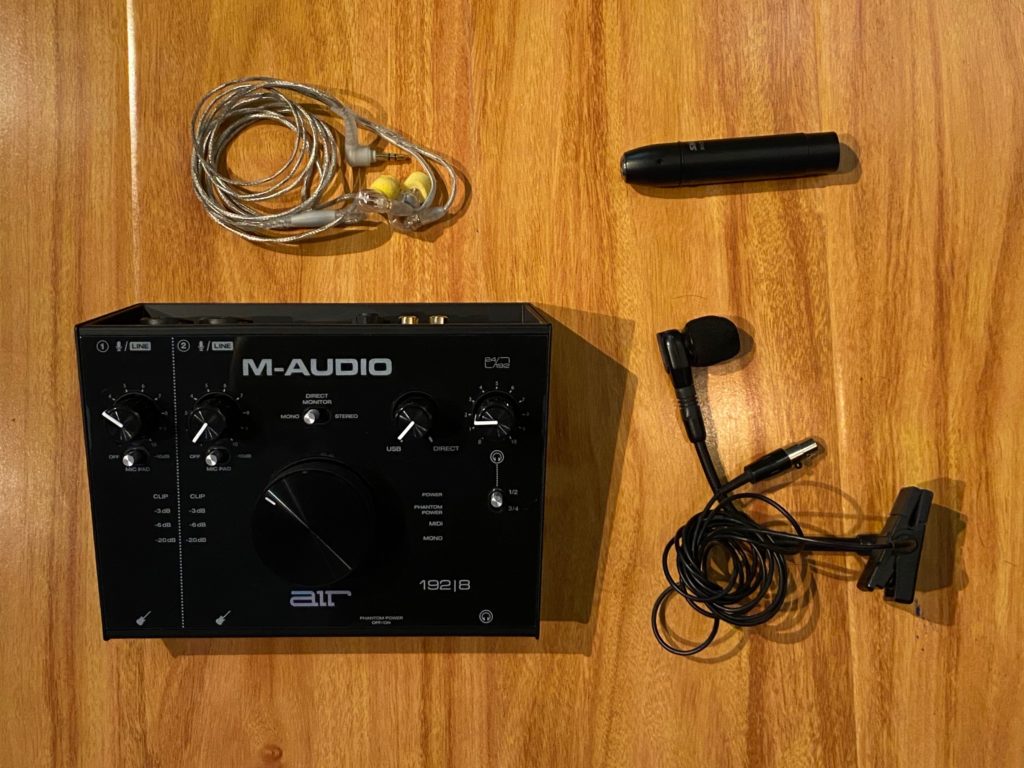
It’s been a challenge finding a place to record some sax stuff in my small condo, and all the music places (stores/studios/etc) are closed due to COVID-19. Then it dawned on me that I can record in my car!
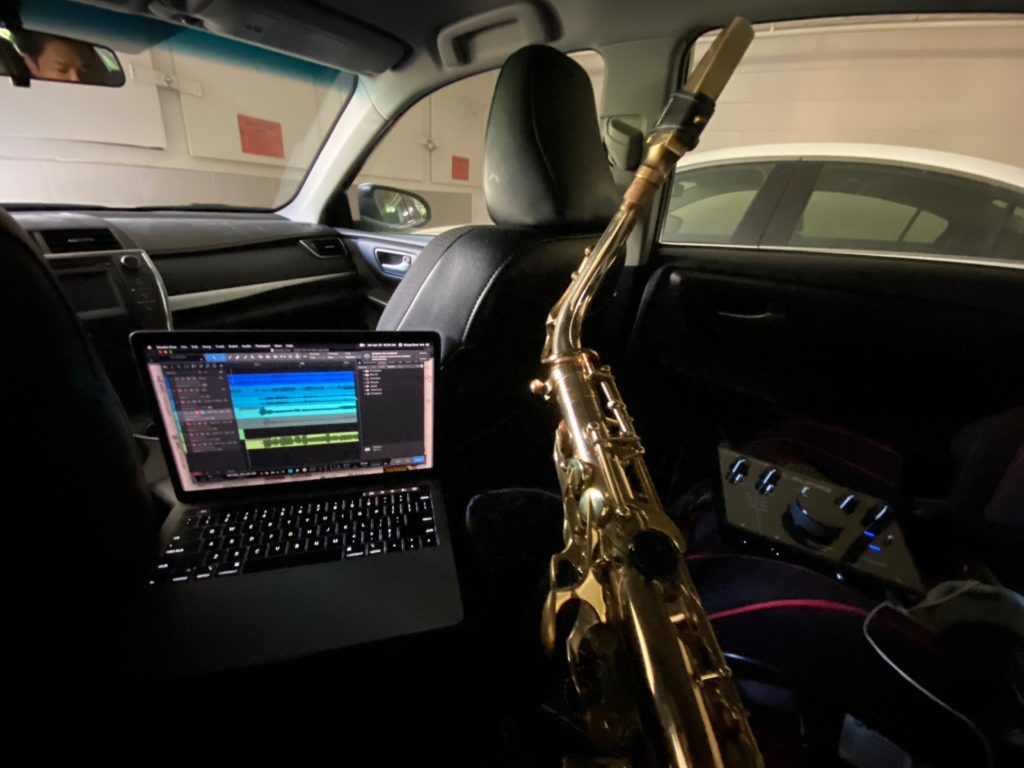
I had to figure this out asap because my friend and former bandmate Richard Borja asked me to record a sax solo for a song he’s been working on. He asked me to post my equipment so here it is.
I’m new to migrate. And it’s a beast. But I think after a few dozen hours of diligence, I think I’ve figured out my preferred method.
This post is for someone who already understands how to use views, develop custom modules, and knows how to use drush migration operations.
I originally tried using migrate_drupal, which honestly did a great job at migrating my user roles, users, and taxonomies. But the site I am migrating is 5 years old with a good amount of technical debt having been touched by over 10 (and maybe even 20) developers over its lifetime, so I think it’s time for a fresh start. I want to migrate everything else (content types, files, etc) manually.
All the Drupal 7 content types were using image (file) fields, but I want the new Drupal 8 site to use media fields. I couldn’t use the migration provided by migrate_drupal, so I had to get creative.
This will be a two step process:
If you’re having trouble getting Mailhog (I’m using it via Valet Plus) to intercept mail from your local Drupal 7 installation, add the following lines to your settings.local.php:
// Mailhog.
$conf['smtp_host'] = '127.0.0.1';
$conf['smtp_port'] = '1025';Lots of other places suggestion using text-shadow to handle bold hover/active states. My client had a complaint that it made the text look blurry (which it absolutely does). Here’s my solution (written using general CSS selectors). Let me know what you think!
a:hover,
a.active {
  letter-spacing: -0.15px;
  font-weight: 600;
}
The letter-spacing is not perfect, and there is still a tiny sub-pixel of movement, but it was a compromise between actually-bold text and blurry-bold text. Adjust to your needs.
I spent a number of hours yesterday trying to figure out how to customize individual links for the main menu. Drupal 8 is a bit more straightforward, but it isn’t quite so obvious in Drupal 7. There are no template suggestions or theme hooks in the HTML comments when you turn theme debugging on, so it took me a while to figure it out.
Thankfully, with the help of PhpStorm and xdebug, I was able to pinpoint what template file to create: menu-link--main-menu.tpl.php
Here’s my code that allows me to replicate the menu links exactly. Then customize as you wish.
Run the following in your terminal:
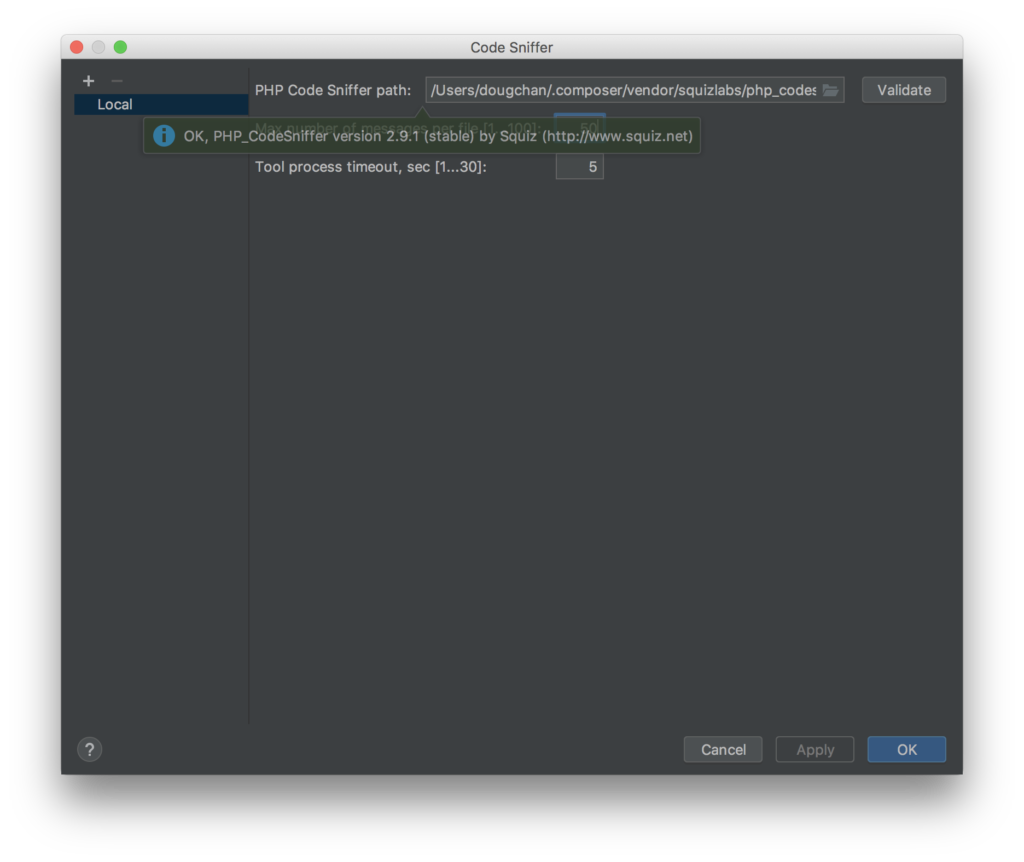
Open PhpStorm preferences (⌘,) and go to the Code Sniffer settings. Click the “…” button.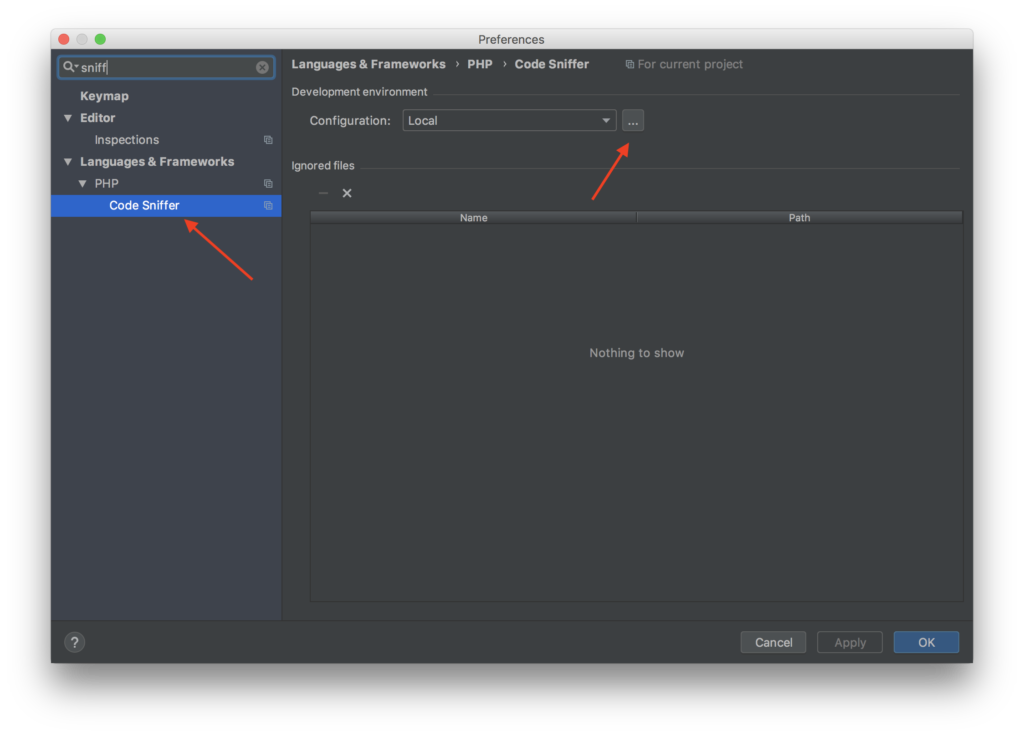 Enter the path to your “phpcs” file and click “Validate”. It should be ~/.composer/vendor/squizlabs/php_codesniffer/scripts/phpcs (replace “~” with your actual home directory)
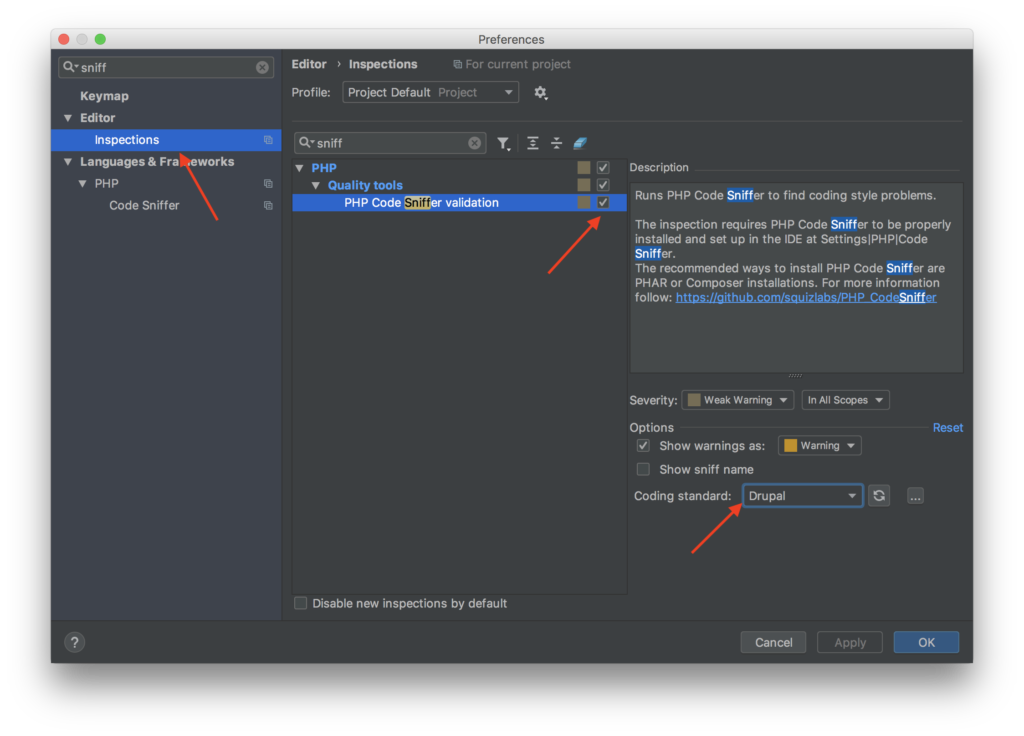
  Go back to the PhpStorm preferences, navigate to “Editor » Inspections”, enable “PHP Code Sniffer validation”, then choose “Drupal” in the “Coding standard” dropdown.
  Enjoy!
Documentation for Drupal 8 is still really lacking. There is SOME documentation out there, but in typical Drupal 8 fashion, you have to sift through all of the pages and all of the content to find exactly what is relevant to you. This guide is an attempt to get you quickly started.
This guide is for dummies, but it also assumes you know the basics of Drupal 8. Specifically, you should be comfortable getting an installation of Drupal 8 up on your own, you have you’re comfortable editing text (config) files, and you have basic site-building skills (Creating content types, creating views, etc).
Before we get started, I want to say that, when I am making an API for a new app, I want to make it FAST. I am comfortable working with the MEAN stack (using MongoDB + Express to run your API server), but I consider myself fairly proficient in Drupal, so why reinvent the wheel every time manually writing an API when Drupal already does a great job at assembling and delivering data? I’m able to get my API working with GET requests in less than 5 minutes, and POST requests in less than 15 minutes.
OK, enough small talk – lets get started.

Thanks to iFactory for putting me through Acquia certification! I definitely would not have passed without having learned so much from working there in the past 5 months.
Here’s the breakdown:
Interesting outcome since I feel that I’ve been really comfortable with my frontend development. Ah well. Feels good to finally be done with the exam!
I’m in the news! I started a new job almost half a year ago as a Drupal developer. When I started developing with Drupal almost about 6 years ago, I had no idea that it would take me this far. I always thought that Drupal was way more trouble than it was worth. Well, it turns out that all my learning paid off!
Read more here: https://pbn.com/rdw-group-adds-12-employees/
 I bought the tickets the moment they became available. Can’t wait to go to this ONCE IN A LIFETIME event!! It’ll be awesome to see how other musicians put together this music by Dream Theater.
I couldn’t find a good tutorial on how to do this from the ground up, so here is a definitive one that’ll get you started.
For this tutorial, you will need
Ok, let’s get started! Here’s a basic new installation. Yay.
Boo Ada (aka Master Random) paid me a visit in Boston! Listen to us talk about music and other random stuff.
I made some updates to my Web/App Portfolio page. I released the Shoot Shoot Guam app over the summer, and I was hired by Guamzilla to create a fun teaser page for them. Go there and check it out!
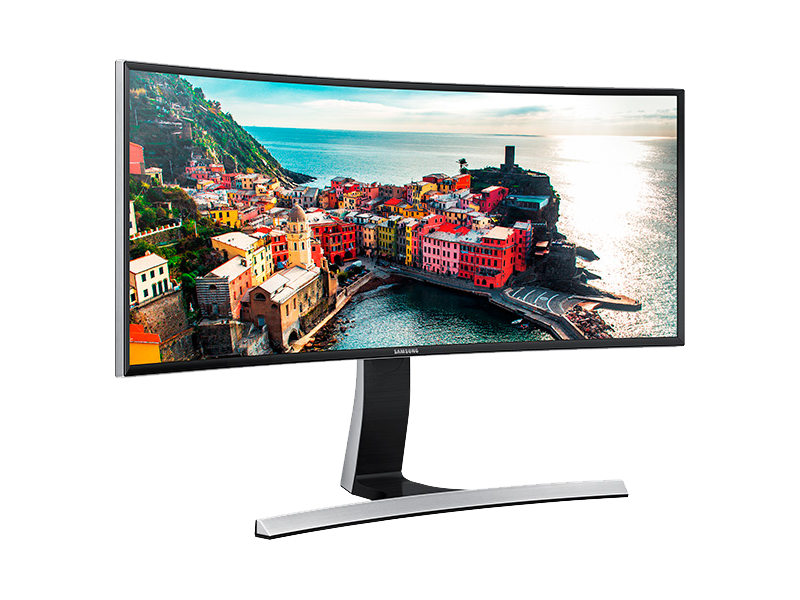
What a beautiful display.
Thanks to my friend Tim sending me so many links from /r/battlestations, I’ve been thirsty for an ultrawide display. I found a good deal for one on Amazon in their refurb warehouse, so I bit the bullet and bought one. Although I did read that they were compatible with Mac, I didn’t know if they’d be compatible with mine. Let me just clear it up for the record: yes it does work!
The refurb only came with a display port cable and no mini-dp adapter, even though the manual said it should have, so I had to wait an extra couple days and order one. I was scared that it would need an active dual-link DVI adapter like my Crossover 27″ IPS display, but to my surprise, it didn’t! It worked directly with the display port cable (with the adapter) on both my Retina iMac and my 3-year-old MacBook Air, so I am one happy camper.
And let me tell you, this is the most beautiful display I have ever used, ever.
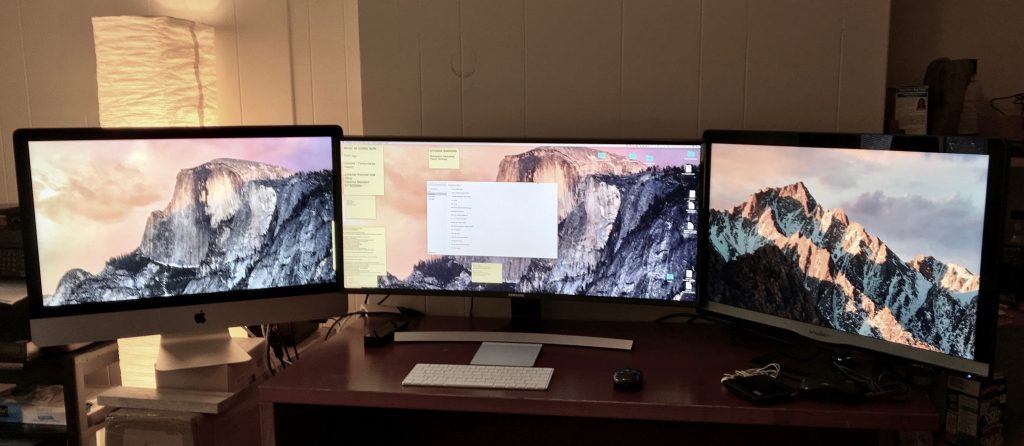
My current battlestation! Retina iMac on left, Samsung curved 34″ in the center, Crossover 27″ IPS on the right.